Warnings and apologies in advance, but this is going to be a very long post as it will detail not only the rest of the construction of the cart, but its finishing and then actual fitting out with my components as well!
At the end of Part 1, we'd just finished gluing up the bottom of the cart's three shelves. As you can see from the photo below, the tape has come off of both of the I structure and the bottom shelf. With those sub-assemblies complete it was time to go ahead and work on building the other two shelves.

Fortunately this time around we'd finished up some other projects (and, to be honest, bought a couple of extra clamps) so we could glue up two of the shelves at once. This assembly was really pretty much a dry run for building the doors of the gaming table, and there were a few things we learned from this build that we'll change next time around.

When we glued the long edges, despite having clamps holding the trim piece to the plywood, the long clamps holding the assembly together during gluing flexed a bit creating some separation on the main glue joint which is fairly visible from one side. We've come up with a couple of ways that should help us get around this on the next project.

While the long-trim on the middle and top shelf were trying, we started work on the four legs to get them ready to go. This involved a fair amount of work through the planer to ensure we had four equal thickness legs as, if you remember from the first entry, this was all effectively scrap wood. Scrap white oak, but un-dimensioned scrap wood regardless!

Once the glue had dried on the long runners on the top shelves, we notched the end runners and taped them up as well.

As you can see from the photos above and below, we are trying a few different schemes to cancel out any forces imparted into the parts from long clamps flexing. This could probably be solved by using higher quality clamps, but I honestly didn't want to exceed the budget of the cart in clamps at this point!

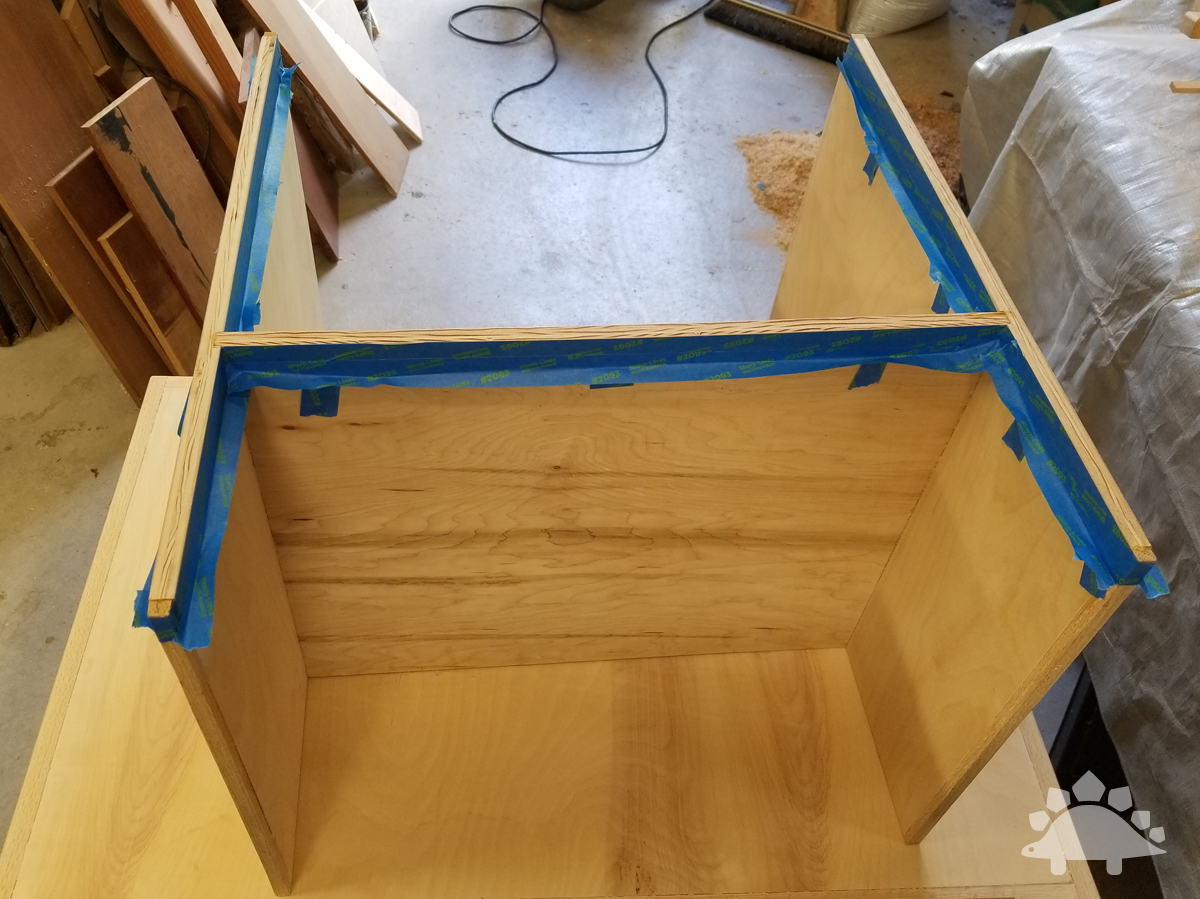
With the shelf divider and the three shelves assembled and sanded (below), it was finally time to start moving toward final construction of the cart!

The next major step was cutting notches in the trim on all three shelves to accommodate the legs. Once we decided where we wanted the legs to actually sit on the structure, we marked it and began setting up jigs to cut the slots.

We used clamps to hold all three of the shelves together, and then set up a fence with 90 degree angle brackets and eventually one of the legs themselves to ensure that we would be able to consistently notch all of the boards, at all four corners!

Cutting the notches themselves was done with a router in about three passes. In the photo below you can see yours truly cutting one of the notches. The key here is taking your time, only taking a little material at a time (as we're using hardwood), and having a good quality sharp router bit!

We also added a little plywood on both sides of the shelves to deter any splintering that might otherwise have happened as we ran the router through all three shelves. It ended up working great and we had three well-aligned notches in each shelf - at all four corners!

With the notches for the legs cut, it was time to move on to actually fitting the legs themselves. As you can see from the photo below, the corners on the leg have been rounded over to make it easier to finish. The leg fit perfectly into the slots, so it was time to move to actual final layout and assembly!

We smoothed the edges of the shelves as well using the same round-over bit we'd used for the legs on the router table. With the basic layout ready to go, we first glued and fastened the I-divider to the middle shelf.

This, of course, involved a fair amount of glue and tape once again. We also created "gutters" in the tape as the middle shelf would be above the I-divider and there was a chance glue could run. If the glue ran down the front of the plywood, it would make those areas difficult or impossible to get a decent finish on once the cart was complete.
The tape continued into the middle shelf itself. Note that the middle shelf has the flat side facing downward. This is because the trim itself creates a perfect lip around the circumference of the middle shelf to keep my bins from falling off! It also make adding the divider easier as it doesn't have to be notched to accommodate the trim.

Once the middle shelf and divider were aligned (below) we then flipped it over and fastened the divider to the middle shelf with the pneumatic nail gun.

With the middle shelf drying, we cut a couple of mounting blocks for the casters out of a 2" x 6" length of Doug Fir. This is the only soft-wood in the whole build, but it didn't make any sense to use nice hardwood for these bits, and we had a length of scrap fir lying about - so once again the price was right!

Once both shelves had dried (enough), it was time to start assembling the cart itself. Unfortunately I didn't take as many pictures of this stage of construction as I should have, simply because I was trying to get the cart assembled in one final afternoon so I could bring it home for finishing. In the photo below, however, you can see all of the key techniques used to assemble the cart. the legs are screwed to the shelves with two screws per leg per shelf (a total of 24 screws). These are recessed into the oak legs with a special drill bit, and then another bit is used to create a plug from face wood (rather than using a dowel which will have end grain facing out). If you have wood available with a similar grain, you can sometimes make the hole disappear entirely. Alternately you could use a contrasting wood to create a "feature" of the piece.

The hardwood plugs are glued in place. Once try, I used a chisel to carve the plugs back flush with the leg and then performed final sanding. I had one screw snap on me during assembly, so the middle shelf has three plugs on one leg.

The casters for the project are repurposed Ikea casters... which is ironic since this whole odyssey started because the Ikea cart I'd wanted wasn't available. I simply drilled holes in the fir and re-used the screws which came out of the piece of Ikea furniture that we re-purposed (and didn't need the casters on anymore).

The cart itself is finished with natural wipe-on Danish oil. Nothing fancy, but it gets the job done and looks pretty good. At the end of the day, this is a cart and it is going to get a fair amount of use. Danish oil finishes can easily be renewed if needed and they don't take days (and multiple coats) to get a good looking end product.

I hadn't mentioned it before, but in the photo above you can see the block that will angle the tackle boxes on the bottom shelf. it's honestly just a left-over off cut of the trim we used for the shelves!

Honestly I think the cart came out looking great. The wood grain really took the Danish Oil well, and for a work cart that effectively cost $80 in wood and $10 in finishing supplies, it's a heck of a deal. Granted , it took about 15-20 hours of work, so if I factor that in, the price shoots up quite a bit! The only remaining question was - does it actually work for the intended purpose?

The answer to that question is a resounding YES. I added some mounting screws, so the drawer organizers are all actually hanging from the divider and aren't simply sitting in the space.

The tackle boxes all fit nicely into their bin on the bottom shelf as well, and as hoped, there is plenty of room for additional tackle boxes (which I need to deal with some surplus and other items I haven't quite gotten around to organizing. The plastic storage bins for my resistors and capacitors, along with my DMM, transistor tester, etc. all fit nicely on the second shelf, and the bins are unlikely to go flying off unless I'm getting crazy when I move it around.

I have a desk mount electrical outlet I'm going to add to the top shelf. I've already put some felt on it to keep it from marring the cart, but I'm waiting a couple of days to attach it to the cart to allow the finish a couple of extra days to completely harden up. I also have a soldering mat on order that it going to sit on the top when I'm soldering (which will be a lot of the time).
At this point I'm still getting components organized and off of my workroom floor and into the appropriate bins on the cart. I should have that done this evening, and be able to move the cart into my workroom. Because the cart is mobile, I'm now freed to work not only in different spots in my work room, but in other rooms if needed as well!


No comments:
Post a Comment