
Aion's IVP Preamp is based on the Intersound Instrument Voicing Preamp first released in 1978 as a rack-mount. The Aion build shrinks everything down to a more convenient pedal size, while being a direct clone of the original. Pre-drive and post-drive effects loops are not included by default, but can be added as long as you're willing to do a little trace cutting. AionFX left them out of the default build because there was doubt over the practicality of the loops when dealing with a pedal version of a pre-amp. I decided to go with the default build with a simple input / output.
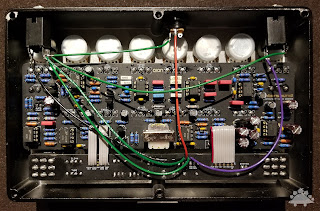
Looking at the main PCB (above), it isn't hard to see why this is considered a difficult build. There are a lot of components, and a lot of places things can go wrong if you're not careful. The 3PDT daughter board (below) is a bit unusual as well. Instead of simply serving as a bypass, it is also houses part of the power supply as the pedal operates on a bipolar +/-15V - generated from a normal 9V DC supply. This avoids the necessity of mixing a 9V AC supply among a population of pedals that generally run on 9V DC. I actually run one pedal on 9V AC from my T-Rex Fuel Tank - a T-Rex Replica pedal. It has a big red cord going into the big red "AC" source on the Fuel Tank. Hopefully I'll never get it reversed as that would lead to the death of multiple pedals.
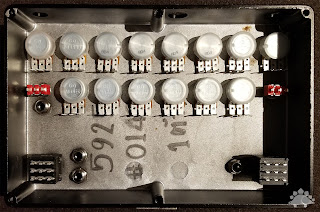
Apart from the exotic parts list required because of the power system, the IVP uses a lot of more mundane components as well. As you can see from the partially populated enclosure below - there are 14 separate potentiometers, two SPDT switches, four LEDs (with only the bezels installed below), and two 3PDT stomp switches.
Once you actually get the board set into the enclosure (which is a feat of dexterity on its own), getting it wired up honestly isn't much worse than most other pedals. You can't run it easily off of a 9V battery, so no option for one is provided. There's an extra ground wire coming from the daughter board, but other than that the wiring is simple - you just need longer lengths!
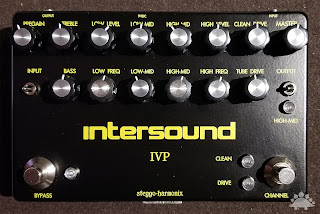
For the enclosure art, I just went with text on this one, along with a old school "intersound" logo. I did make one goof in the process, the LED labeled "HIGH-MID" should be labeled "PEAK" - but I'm not going back and fixing it at this point. The LED comes on when you're breaking over into clipping behavior on the amp. You actually want to see it some, but not all the time - it is sort of a balancing act. The really hot Seymour Duncan pickups on my Chapman ML-1 Pro Hybrid can certainly keep that light on if I want it on!
I ended up using several Boss style knobs on this build because, well, that's what I had 14 of lying about. Of course, now I'm going to need more for some "other projects" I have upcoming, so I sense another Love My Switches order coming in the not so distant future.

As you can see from the back view (below) the pedal without effects loops is fairly spartan. Honestly, that's fine from where I sit as I have other pedals with effects loops that I often struggle to utilize effectively except in very rare circumstances.

Once the pedal was together, I spent a while going through all of the controls ensuring that it was functioning properly, and so far everything seems to be perfect. This was a challenging build, and I love the fact that it fired up right away. The Tube Drive channel is especially good on this particular preamp, and I expect that once I get the recording system set up on my computer, I'm going to be putting it to frequent use!


No comments:
Post a Comment