Prior to this build, I owned one Stratocaster - an overall black one with cream pickups - and yes it looks a lot like "The" Black Strat. As I'm (obviously) a David Gilmour fan, I also wanted to have a strat with the EMG active pickup set he started using in the mid-1980s. That being said, my existing strat is a special edition, and I kind of want to keep it stock. I therefore started looking for a way to build my own "partscaster" centered around the EMG DG20 electronics.


This is officially my second guitar build, and in many ways I'm going a similar route as I did for my P90 Warmoth build. I'm starting with a pre-built and finished body and neck. I'm even starting with a pre-wired pickguard, so getting the electronics going is much easier than what I ended up going through with my SG tribute build as well (never fear - future builds will go back to those where I'm doing my own wiring). In essence this build is my version of David's "Red Strat" pictured below.
The Pickups
As the whole point of this particular build was to use the EMG DG20 pickup set, that's where I started. The first decision I had to make was whether or not I was building an exact clone of the Red Strat or more of an "homage" to the original with my own colors / configuration. I ultimately decided on the latter, so my first decision was to pick a color for the pickguard set. I decided to go with black - black pickguard, black pickups, black knobs - in fact it could effectively be "none more black."
Although the pick, volume, and tone knobs look fairly conventional, there is a bit more underneath the surface going on with this set. The pickups are EMG-SAs with a normal 5 position blade switch (with the normal options - neck, neck-mid, mid, mid-bridge, and bridge). Instead of the normal tone pots, however, it has the EMG EXG and SPC circuits. According to the DG20 instructions:
"The EXG control adds the feature of boosting both low and high frequencies while the SPC is a mid-boost designed to enhance the mid-range response of the instrument. The EXG and SPC controls are effective when turned clockwise, and fully bypassed when they are turned counter-clockwise."
The Body and Trem System
For this build, I had a couple of different options for the body - some of which would get me where I wanted to go more quickly than others. The EMGs are active pickups, so I seriously considered picking up a Warmoth body with a battery box. The problem there is that Warmoth is backed up for several months and I'm already waiting on another body from them for a build (oooh, foreshadowing!). However, as the EMG pickups include instructions on where and how to place the battery if you don't have a battery box, there is also a currently in production body direct from Fender that I really like. The problem (at least in my mind) was I'm bit hesitant to buy a whole guitar just to part it out. Ultimately I found the solution online - let someone else do the parting out. The STRATosphere offers parts from several makes, so I picked up exactly what I wanted from them - a Mexican Fender Aged Cherry Burst body with the hardware (without the hardware didn't save me that much, so I went ahead and had them include it).
As you can see above, the body is absolutely beautiful and exactly what I wanted for this build. The flame maple top is gorgeous - even if it is just a thin veneer The tremolo is pretty much the same as what I have on my black strat, so I may upgrade that at a later date, but it should do for now!
The Neck and Tuners
Now that I had the body, I just needed a neck. I'd thought about picking up a brand new neck directly from Fender, but they're fairly pricey, and the nut only has pilot holes for the strings and needs final adjustment (something I'm going to have to do on another build - more foreshadowing!). I managed to find a US-made strat neck that already had the nut dressed (though I may have to tweak it once I get this build together). It was like new (still had the tag) and included the tuners!
So, armed with all of the key bits - onward and upward!
Putting it Together!
I started with the easiest bit - bolting the neck to the body. The body came with a neck bolt plate and screws, but it had a lot of extra stickers and the original film over it. I removed the film, and then took off the compliance stickers. That, of course, left behind all of the sticker adhesive on the plate, so I used a little Goof Off to get the adhesive taken care of leaving the plate pristine - apart from my greasy fingerprints, which sadly are a fact of life (and which you'll see a lot more of in the build pictures).
The body came with the plate and the screws, but I'm hesitant to re-use wood screws when I have the option. Neck screws are cheap, so I went ahead and replaced them with new ones from Fender.
It was then a simple matter to screw the neck to the body. Although the body didn't original have a neck plate pad, I added one to minimize any scratching of that beautiful finish going forward. So, with the easy part done - on to the wiring!
EMG includes really great and clear instructions for installing their pickguard into your guitar. They assume you're staring with an existing, fully built instrument, so the first thing they tell you to do is remove the strings from the instrument. That was easy as mine had none.
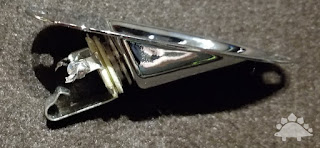
The first real installation step is swapping out the mono 1/4" plug jack for a stereo one that they have pre-wired. The mono jack that came with the instrument (above) had already been stripped of its electronics (as STRATosphere sells those separately), so it was easy to simply unscrew the mono jack - no wires had to be cut.
The stereo jack includes a battery negative (ground) and an output cable (black and white). These are already soldered to the jack, and they specify that the spring terminals should point downward.
Next it is a simple matter of feeding the wires through the hole in the body and screwing the input jack back down to the body. They also have you plug in a 1/4" cable to make sure there are no issues or blockages inside the cavity as this is the easiest time to fix them. I didn't have any issues, though it initially took a bit more force to plug in the guitar as the stereo jack has two contact terminals, rather than one.
With the input jack in place, it was time to start plugging in the pickguard itself, and honestly they made it really easy. As you can see in the photo below, the wiring is neat and well contained.
Getting everything hooked up is also trivial. Everything has a clearly labeled plug and no soldering is required - at least if you're not using a battery box. If you are using a battery box, you need to cut the battery connector off of the red/black battery cable and solder the plug to the leads from the battery box. They even include red and black heat shrink to insulate the solder join!
Once everything is plugged in they have you do a simple tap test on the pickups to make sure everything is working properly. The pickguard checked out, so I moved on to the next step - final installation!
I've always had trouble getting all of the protective film off of pick guards. It always seems to want to stick and stay behind where I don't want it. I've gone to pulling the knobs and getting the film off that way. I have a handy set of plastic ratchets I use for pedals and other builds where I don't want to mar the surface, and they worked great so I could remove the last of the film.
Next step was actually getting the instrument strung and at least marginally set up. This was the first time I'd tried to string a guitar that didn't have locking tuners, but I eventually managed to get the strings on and even in tune! I adjusted the pickups to roughly match the height I have on my P90 build, and then went to try the guitar out.
The verdict? Ummm... WOW. In many ways this has the normal "strat" sound, but it has a very unique voice - especially once you play with the mids using the EMD electronics. At this point the action is a bit higher than I'd like, and it needs to be properly set up (which I may get my favorite luthier to do once the shop reopens from staffing shortages), but even with my ham fisted set-up, it plays beautifully. It also looks absolutely killer! The only other thing still on the "to do" list is replacing the white trem arm knob with a black one, but as that's a minor detail I decided to go ahead and share this beauty with the world.


No comments:
Post a Comment