
The board above is the Tayda board. For this build I decided to go back to the BMP's roots, and build the "Triangle" variant released in 1971. While original copies will set you back well over $1000, one cool thing about this particular variant is that in 2018 it was re-released in a smaller form factor (125B) and can be had new for around $110. That being said, the "build it yourself" version is still likely to be even cheaper.
The Tayda board is designed to go into the larger Hammond box (seen below), so I sort of stuck with that for my enclosure. For the Tayda build I used a mix of vintage and modern components. The resistors are all modern metal film, 1% tolerance resistors (Yageo and KOA Speer for the most part). A few of the film capacitors are modern, but I also used several earlier Panasonic film capacitors into the mix. The diodes are NOS 1N914s from Pedalhacker. Unfortunately it appears as if he's now out of these, so that particular source of vintage components has dried up for the time being. Transistors are always a sticking point on these builds, with most modern DIY projects recommending a 2N5088 (one of these years I'm actually going to have to build a vanilla BMP with a 5088 just to see what it actually sounds like!). To try and get back to the original as much as possible, I went with PN5133 transistors - also from Pedalhacker. Again, it appears as if these are unfortunately no longer available, so I hope my personal stock holds out for a while!
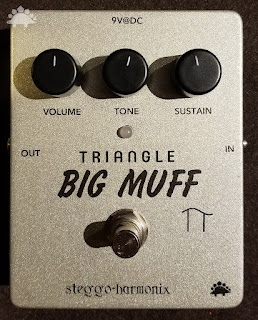
As I mentioned, this project was designed for a larger enclosure, so as my computer with Illustrator and Photoshop was still down at the time (it's nominally up at this point - keep your fingers crossed!) and I couldn't do elaborate case art, I decided to to my best to emulate the modern Triangle enclosure as much as possible with creative font work. I think it came out pretty well!

The second build started out in a far more basic form. The photo above actually shows the PCB after I'd taken my Dremel and drilled out all of the holes. Again, my hobbyist background served me well. As you can see there are literally no markings on the PCB. You have to go from the layout entirely! This particular build is for an early Ram's Head similar to what David Gilmour would have used - so in many ways it is analogous to the previous Ram's Head build on the Aion FX board - though it doesn't have the mids modification.

As this board was as old school as you could get, I wanted the components used on it to look the part as well. For this build I used all Allen Bradley Carbon resistors with a 5% tolerance. I'd predominantly used these on my previous build, but I'd had to make a few substitutions. For this build I decided to just wait and find Allen Bradley resistors for the whole board, and the end result looks great (note to self - investigate clear polycarbonate or lexan enclosures for future builds!). As this is a completely old school board, I also quickly learned the importance of flux in the soldering process!

As with the Tayda build, I used the NOS 1N914 diodes for the clipping portion of the circuit. I went ahead and used the Panasonic film capacitors across the board for this build, because they looked the part. Older BMP pedals actually used a variety of ceramic and film capacitors, so I may look at using ceramics in the future just to see what the difference in tone is between the two. The electrolytic capacitor and the 1N4001 diode are new. Electrolytic capacitors generally don't age well, so I always use new ones, even when I'm going for a vintage build.

Like my previous build on the Aion Halo board, I used NOS 2N5133 transistors for this build. They're as close to the FS36999 transistors used in the triangle and Ram's Head variants that you can easily find - and there is a school of thought that the FS36999 is actually just a relabeled 2N5133.

I went ahead and soldered the potentiometers directly to the board like I'd do for any other project. This provides some decent structural rigidity to the board and means I didn't have to secure it to the enclosure with tabs. For future builds, I may just run wires and use solder lug pots to give me more layout options.

As you can see from my hand drilled enclosure above, the pots are fairly tightly grouped, but not inordinately so. I went ahead and used a Hammond enclosure, and since this one (as opposed to the enclosure I used for the Tayda build) wasn't pre-drilled, I decided to put the input and output jacks to the top of the enclosure as it makes fitting the pedal on the board a bit easier!

I went with a goldish tone on this one - actually called Pale Burnt Metal. I had a few issues with the painting, but it ultimately came out pretty nicely. I think going forward I'm going to stick to spray paints rather than the Alclad metalizer as I'm not getting any major benefit from the metalizer and it is a lot harder to apply.

Once again, I tried to match the fonts from the original Ram's Head version as closely as possible, and once again I'm really happy with the result! I also used modern EHX style knobs for these to sort of bring the effect together. From the photo above, you can see the DC jack on the triangle and the full set of jacks on the Ram's head. Even with my very flat patch cables, I generally prefer to have the jacks to the top if possible.

Finally both pedals got their Steggo plaque - though that was after testing. Both of these pedals are absolute fuzz / distortion beasts! When I put the "homebrew" Ram's Head through my tube amp, even with the amp mostly turned down, I set up enough vibration playing the opening of Pink Floyd's "Sorrow" to bring my computer out of sleep mode! I'm definitely planning on building more of these - they're just too fun and there are too many great varieties. I also have a couple of surprises coming along these lines


No comments:
Post a Comment