

The bottom side of the top board includes a toggle switch for tap functionality and the primary IC that runs chip. You can also see the sockets for the pins from the secondary board. Anasounds includes everything you need, but I typically swap out IC sockets for the round hole type in all of my builds. As you can see, some of the wiring is already in place. Anasounds provides solid-core wiring rather than stranded.

Above is the top of the second board with the rest of circuit. Again, at every step of the process you're able to measure voltages and compare them to what they are supposed to be to ensure that everything is working as intended.

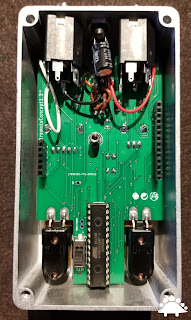
The bottom of that board includes trim pots for Bias and Gain which are adjusted as part of the build process. It also includes the vactrol which forms the heart of the optical tremolo itself. The boards are fairly open and assembly is generally not too hard. The only challenge came when adding some of the DIP sockets after other portions of the circuit board were built, but it just required a little dexterity!
As with the pots, the stomp switches are also soldered directly to the main board. The main board is also equipped with set screws and supports to ensure the pedal holds together without issue and is structurally supported. The back of the top board also includes a surface-mounted LED that is visible through the enclosure

The enclosure itself is nice with an etched face plate with a see through "FX" in the center that allows you to see the LED.

The sides and bottom of the enclosure are bare metal - which works with the overall design aesthetic of the face plate, so I didn't bother trying to paint it. The north face of the enclosure includes the in, out, 9V DC, and an auxiliary out socket. This socket is designed to interface with another Anasounds kit (the third kit mentioned in the introduction). This port is designed to plug into the Spinner - a separate pedal that allows you to control the trem speed by kicking the spinner on that pedal. I'm really not sold on the real world utility of such a device relative to other solutions out there, but I may pick one up down the line just to experiment.


No comments:
Post a Comment